![]()
![]()
![]()
![]()
![]()
![]()
![]()
![]()
![]()
| CAPTURING FROM VHS - PART 2 - INVERSE TELECINE | Diogo Figueiredo |
INTRODUCTION:
What do you think about increasing the quality of your DivX ;) movie-CDs
while decreasing the file size? Even more: making the encoding time shorter!!
A miracle? No. It is possible (sometimes) with a VirtualDub function that
I forgot to mention in my first article (see "Best resolution for
capturing from a VHS source", by myself). To be honest, I didn't
forget to mention it. I just didn't know it existed. Well, living and
learning! That "almost miraculous" resource is called "inverse
telecine", and I'll be sharing this experience with you now.
LIMITATIONS:
This article is useful if you are working with a video source that uses
the NTSC color system (thus, uses 29.97 frames per second), and that was
originally made for the cinema (24 frames per second). Most of the movies
you find in your "Blockbuster video store" are included in this
category. This is completely useless if you are capturing a TV show, for
instance.
I don't know how this applies to PAL movies, which work with 25 frames
per second, because all my equipment is NTSC. If I find anything about
it, I'll post it as soon as possible.
LEGAL NOTICE:
It's never too much to say that making copies (it doesn't matter the media)
of any copyrighted material is illegal, unless you own the copyrights
or have an authorization from the copyrights owner. This is specially
important in this article, since it deals mostly with the capture of movies
first intended to the big screen. Also, I'm not responsible for any problems
or damages caused by the information hereby expressed. Proceed at your
own risk. If you disagree with any of these, stop reading this guide now.
Otherwise, good luck.
PROCEDURE:
Let me go straight to the point: the NTSC video uses 29.97 frames per
second. The films intended for the big screen (movie theaters) use 24
frames per second. So, when you put a cinema film into a NTSC cassette,
some conversion must be made. How is that made? That's simple: first,
the film is slowed down by 0.1 percent, to be at 23.97 frames per second.
Then, a new frame is inserted in every block of four frames, resulting
in 29.97 frames per second. The problem begins in that "frame insertion".
You can't just add a blank frame or repeat a frame, which would make the
movie choppy. Thus, the video fields are used. At this point I suppose
you know what video fields are. If you don't, this article is not YET
for you. Try to learn about video fields and come back later. Here's what
is actually done to every block of four frames:
-The first frame is kept untouched.
-The second converted frame is a mix of the first and the second original
frames, both separated by the fields, which means that the even field
is the first original frame and the odd field is the second original frame.
-The third converted frame is a mix (the same way as above) of the second
and third original frames.
-The fourth converted frame is the third original frame.
-The fifth converted frame is the forth original frame.
At the end of all that, what you get is a sequence of frames that goes
like this: three non-interlaced frames, then two interlaced frames, then
three more non-interlaced frames followed by other two interlaced frames
and so on.
Every interlaced frame will be a mix of two actual frames, and in case
you have a high motion (a lot of difference between the two original frames
that were mixed together), they will look like this:
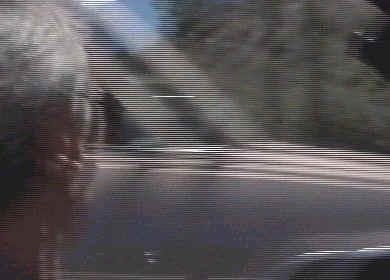
INTERLACED VIDEO FRAME
Compressing an interlaced video source is a waste of space. Thus, something
has to be done. Besides that, you would save 29.97 frames per second of
a video that was made at 24 frames per second. That is 25% of completely
useless data, because those extra 6 frames per second were not in the
original movie!
If you just deinterlace your video before compressing (as I recommended
in my previous article - sorry!), you are not getting rid of those extra
frames. All you would do is mixing both fields together. The result would
look like this:
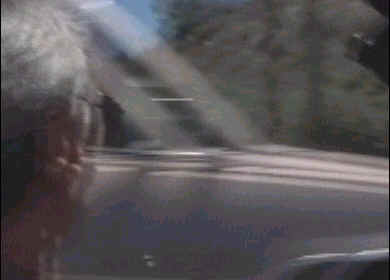
DEINTERLACED VIDEO FRAME
As you can see from the picture above, both images are still present.
I just got rid of the field lines. Besides, by doing this you lose half
of your resolution, since the deinterlace process mixes the horizontal
lines two by two.
And then there's this function called "inverse telecine", which
can be found under the "video/frame rate" pull down menu in
VirtualDub. What it does? When set to "reconstruct from fields -
adaptive", it "demixes" the fields of the frames, so that
they will be exactly how they originally were, eliminating one frame in
every block of five, giving you the final result of 23.97 frames per second.
The frames would then look like this:
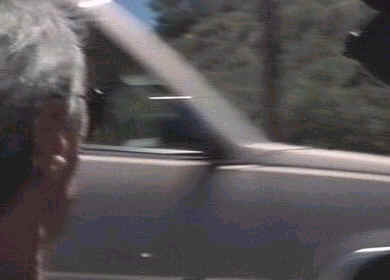
INVERSED TELECINE VIDEO FRAME
Notice that no information of the original movie has been lost. It's all
there as it should be, and you don't loose any resolution at all! Isn't
this enough for you??? What if I say it's even faster than deinterlacing?
(This sounds like one of those "Ginsu-Knife-Don't-Delay-Call-Today"
TV show!).
To put a 2 hours long movie in a single CD using the simple deinterlace
process, I used to use 600 kbits/second with low-motion DivX ;-). Now,
after inverse telecine, I use 800 kbits/second and the movie fits the
same space. That's 33% more quality! Notice that if you are using "inverse
telecine", you don't need to (and you shouldn't) use the deinterlace
filter. The "inverse telecine" does it all. Another important
point is that you movie must have been captured at 29.97 fps and with
both fields complete. That means 480 of horizontal lines.
SHORTENING IT ALL (THE PRACTICAL GUIDE):
-Capture at 512 x 480 @ 29.97 frames per second. VirtualDub does it, although
I strongly recommend "freeVCR", which is a freeware that can
be downloaded from "www.downloads.com" (perhaps you guys from
divx-digest should try to put it on your downloads section - if it's not
already).
-Load you captured movie into VirtualDub and set the resize filter to
512 x 384 with the "precise bicubic" option.
-Go to the "video" menu, then go to "frame rate" and
choose "reconstruct from fields - adaptive" in the "inverse
telecine" box. DO NOT change the frame rate. "inverse telecine"
will do it automatically.
-For the compression, I recommend DivX :-) low motion @ 800 kbits/second
if you want to put a 2 hour movie in a single CD.
-Choose your preferred audio compression (recommended is mpeg layer3).
-Set audio to "full processing mode".
-Go to the "audio" menu, then go to "interleaving".
Set the "interleave audio every" to 30 frames.
-Save your work.
-Have fun.
Some further explanation about "inverse telecine" can be found
in VirtualDub's help file. Enjoy!